
How to Reduce Excel File Size
Did you ever wonder why your seemingly simple Excel file is so large (in terms of KB or MB) or why it seems “sluggish”? We recently received a file from a client who was frustrated because it was taking Excel way too long to open the file or process any changes (i.e. a few seconds each time – how annoying!). The file size was over 20 MB, even though it didn’t contain a lot of data or any complex calculations. It turns out the cause was something we call “Excel bloat”. Bloat means there are likely “hidden” issues with the file that cause performance problems. These issues can be easily corrected if you know where to look and what to do. With a couple of simple techniques, we reduced the file size to less than 2 MB.
Part 1
Finding Bloated Tabs
Where do you start looking within a file for the bloat? How do you know which sheets are responsible for the disproportionate share of the huge file size? It might be obvious if there are a few sheets that have the most data, but what if it’s not obvious? Here’s a quick way to see how each sheet in your file ranks in terms of file size.
Step 1: Do a “Save As”, and in the “Save as type” area, choose “Web Page”. This will create a folder in the save location. You may get a warning that certain features are not compatible with a Web Page. Just ignore this and continue the save.
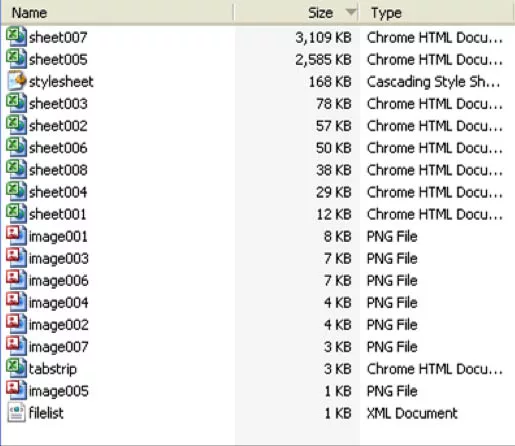
Step 2: Go to the folder (wherever you saved it) and open it. You’ll see files for each sheet (they will be numbered sequentially and not with their proper sheet names) as well as a bunch of other files.
Step 3: Simply sort the files by size to see which ones are the biggest. Note that since the file was converted to a Web Page, the aggregate size of these files will be much bigger than your original Excel file. Don’t worry about that. What you’re interested in is the relative size of all the sheets, and this trick will give you a quick sense of that so you know where to start looking.
Reducing Tab Size
As you can see, the 5th and 7th tabs in our example file are the biggest. But how do we reduce their size?
The biggest contributor to bloat is not actually the amount of data or the number of cells containing data on a sheet, but rather the size of the area of cells which Excel thinks are being used in some way. This is called the ‘Used Range’.
For example, you might have 10 columns of data spread across 5,000 rows of the sheet. In this case, your sheet size would be based on a Used Range of 50,000 cells. This might seem like a lot, but Excel has 17.2 billion cells available on a sheet.
Quite often, the Used Range itself is bloated because Excel not only keeps track of the contents of a cell, but also assigns cells dozens of other attributes (colour, borders, number formats, data validation, etc.). Many of these are not visible to the user. The assignment of some of these attributes can cause Excel to think a cell is important, and therefore include the cell in the sheet’s Used Range. For example, if you select an entire column and apply formatting, the Used Range now includes all 1,048,576 rows in the file, increasing the file size and causing Excel to operate slower.
Since you typically only care about the cells that contain actual data, you can quickly reduce the Used Range (and therefore the size) of the sheet by doing the following:
Step 1: Select the sheet that you have identified as being larger than expected.
Step 2: Press CTRL + END at the same time. This will bring you to the bottom right corner of the sheet’s Used Range.
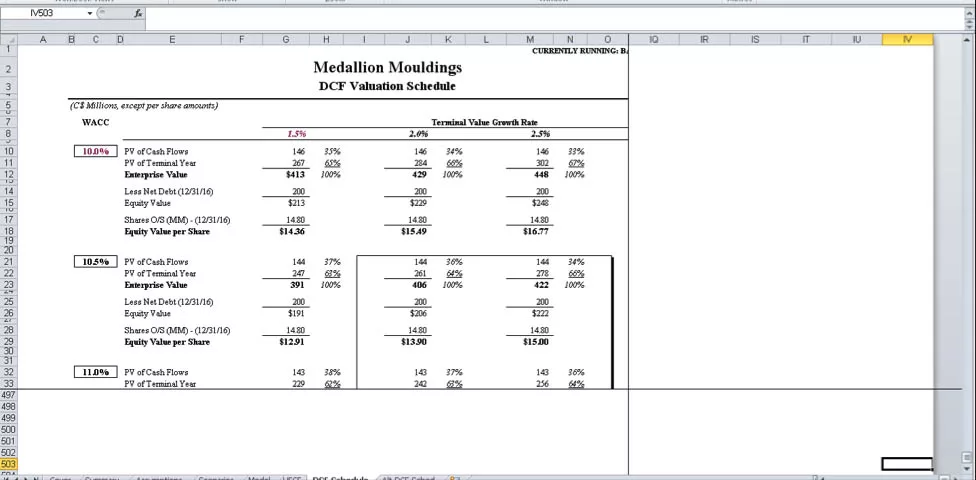
Note: In Sheet007 in the example above, this took us to cell IV503 (see graphic below). IV is the 256th column, so the Used Range was 256 columns by 503 rows, or 128,768 cells, in size. However, we only had data in cells A1 to cell Q53, or 901 cells. The Used Range was 143x the intended size.
Step 3: Now that we know the size of the Used Range, we need to shrink it down to the size of the data. To do this we delete unused columns and rows. Where to start deleting depends on the size:
- Small: If the size of the Used Range is not very large (less than a few hundred columns by a few thousand rows), then you can try deleting all the unused columns and then all the unused rows.
- Large: If the Used Range is very large, deleting thousands of rows or columns at a time might cause Excel to ‘not respond’, hang, or even crash. If this is a concern, start by deleting one row or column at a time from the bottom or right-hand side of the Used Range. Sometimes an oversized Used Range can be caused by a single stray cell with no other used cells in between that cell and your data. Try deleting just the rightmost column or bottom row of the Used Range and then press CTRL + END again. If you are lucky, that will be enough to reset the Used Range to a more reasonable size.
Part 2
Removing Unneeded Named Ranges
Named Ranges are sticky. Most professionals create Named Ranges one-by-one in their files and, therefore, have control over the number contained in a workbook. However, as workbooks get shared and tabs swapped between files, Named Ranges move with them and can grow and grow (with or without users noticing).
Users adding Named Ranges intentionally is one thing, but they can also be created by external programs and applications. For instance, many popular third party plug-ins can generate hundreds, if not thousands, of Named Ranges in a single file. Compound this with worksheet swapping within a team and you have a recipe for Named Range bloat. 30,000+ of these in one file is not uncommon.
Typically, Named Ranges will not significantly increase file size. Sometimes, however, they get corrupted in some fashion and add significantly to the file size. We recently received a workbook which contained over 2,600 Named Ranges, many of which were hidden and included external links. By removing the 2,500+ that were not used, the file size was successfully decreased from ~8MB to ~1MB.
Step 1: Many Named Ranges may be hidden and cannot be viewed or removed via the Name Manager (CTRL F3), so the first step is to unhide them. To do so, you can either search for and download an add-in utility, or you can add and run a macro yourself. Here is the code you will need:
Sub Unhide_All_Named_Ranges()

'This macro will unhide all hidden Named Ranges

'Created by The Marquee Group: info@MarqueeGroup.ca

    Dim my_name As Name

    For Each my_name In ActiveWorkbook.Names

my_name.Visible = True

    Next

    MsgBox Format(Names.Count, "#,##0") & " Named Ranges found in file."

End Sub
If you enjoyed reading this and want to improve your skills further, then try our Excel Best Practices Self-Study Course. You can also browse our other range of Self-Study Courses here.
Training The Street also offers a more advanced In-Person/Virtual Public Course called, Applied Excel. Where you can gain the skills needed for parsing, analyzing, and presenting information from large data sets.